DIY Santa Claus from a five-liter bottle. DIY Santa Claus from a bottle: master class
Some people buy toys for a pine or Christmas tree, while others prefer to make them with their own hands. It is for such people that this master class will be useful. Today you will learn how to make a Santa Claus figurine from a plastic bottle and disposable spoons.
To work you need to assemble the following components:
- one large plastic bottle (5 l);
- gouache paint (red and white);
- three plugs (red and two blue);
- white plastic bag;
- white disposable spoons;
- scissors;
- red and silver rain;
- permanent glue or liquid nails.
First, take a large plastic bottle. It is better to use a 5 liter container.
Paint it completely red. You can use enamel, but gouache will also work.

Cut two rectangles from a white plastic bag and glue them (one on top of the other) to the front of the bottle.

Take disposable white spoons and cut off the handles of all of them. You will glue them onto the toy figurine using durable glue. The following places need to be decorated:
- at the top of the cap - around the cap;
- between the hat and the face - the rim of the cap;
- beard on the face;
- the hem of the fur coat.

To make the hero's face you need to take spoons and lids. Use disposable spoons to create a full beard. Glue on the red cap for the nose. Make two eyes from blue corks. Cut one spoon in half and glue the edges. This is the kind of face you should get!

When all the spoons and other parts are held tightly, start decorating the toy with rain.
Glue the scarlet rain onto the red background using permanent glue.

Place the silver rain on the hat (top and bottom) and on the hem of the fur coat.

Attach a thread that will hold the toy on the branches of the spruce tree.
Do you want to beautifully decorate the New Year's table? Then a themed New Year's look will come in handy! By making a Santa Claus craft from a plastic bottle with your own hands, you will add a New Year's mood to the holiday and make it brighter and richer. In addition, such a craft will look great under the Christmas tree.

DIY Santa Claus from plastic bottles
To make such a craft you need to prepare the following:
- plastic bottle,
- fabric (paper or bag),
- glue,
- scissors,
- cotton wool
First of all, we cover the bottle with white paper so that later it will be easy to work with it.

After this, we cover the body of the bottle with a rectangular piece of fabric or cellophane. From the circle we make the future grandfather’s hat.

Apply PVA glue along the bottom of the caftan and the edge of the hat and glue cotton strands.

Draw grandfather's face on cardboard and color it. We make hands from rectangular pieces of fabric and create a cuff using cotton wool.

All that remains is to glue on the face and decorate it with a beard made of cotton wool. We glue our hands with glue. If you wish, you can make a gift bag and give it to Santa Claus.

This grandfather can be placed under the Christmas tree or just on the holiday table.
Do you want to beautifully decorate the table and interior for New Year's Eve? The traditional hero of the holiday is Father Frost. You can make an original souvenir from it with your own hands. Read tips, get ideas. They are all very simple and understandable. Even a beginner can make such a product.
Materials and tools
To make a beautiful and original craft “Father Frost and the Snow Maiden”, you just need to take the available materials or buy them. They are inexpensive, but will allow you to make a very decorative, elegant thing. So, you will need the following:
- A base that can be used as any bottle, glass or plastic. You can use unnecessary empty one or one that will be served at the table on New Year's Eve. Christmas tree decorations are made from small bottles or jars of yogurt or baby food, and full-fledged figures for the interior are made from a five-liter water bottle.
- Decorative materials. The choice depends on what you have on hand or at your local craft store. It can be: bias tape, fabric, cotton wool, padding polyester, tinsel, sequins, beads, buttons, lace, braid, snowflakes, paper, foil - in a word, everything your imagination desires.
- Scissors, glue, needle and thread, paints and brushes.
The necessary tools are determined by the method in which you will make the craft.
Santa Claus (do-it-yourself) from a bottle of champagne
You will be making the actual packaging or garment for the base, meaning it should be removable. This offers some benefits:
- Allows you to use several times (for the next year).
- Suitable as a separate gift for relatives (they will buy champagne themselves).
- Such a souvenir can be made for sale.
Do-it-yourself Santa Claus craft from champagne is done in different ways. The methods may be:
- Creating a costume from ribbons or with subsequent decoration.
- Sewing or knitting clothes for figures.
- Painting and surface decoration.
Choose the method that makes the most sense to you. Try a few or use what you have at home.
We sew a suit
Making Santa Claus from a bottle with your own hands is very simple, if you make an outfit separately, and then just put champagne in it. You are not a fashion designer, and comfort of clothing is not required here. The main thing is that she looks beautiful. A coat for Santa Claus can be sewn from two halves (for the front and back).

This is done like this:
- Draw an outline like a shirt or robe on a piece of paper or directly on fabric. Make the sleeves one piece with the front or back. It makes no sense to cut out the armhole and sew them in separately. Simplify everything. Make both parts the same.
- Sew the resulting parts from the inside out using a machine or by hand.
- Turn out and decorate at your discretion with any white trim (lace, braid, ribbon, frill, tinsel).
You don’t have to make sleeves for the costume, but if you want the Santa Claus craft to look more realistic, not only sew them, but also fill them with something (cotton wool, padding polyester or other stuffing). The bottom should be sewn up and something similar to mittens should be made. Make a hat or cap.

We tie the bottle
In this way, Santa Claus can be made from plastic or glass bottles. It is better to do this work with crochet.

The easiest way is to create a tight-fitting red suit and sew white decoration on top. It can be either knitted or any other. They do it, of course, by immediately tying in a different color, but it’s more complicated. If you only know how to work with knitting needles and you have them, make a red “tube” on four knitting needles or circular knitting needles according to the principle of a regular sock.

We use ribbons and bias tape
A do-it-yourself elegant Santa Claus is made from a bottle by gluing ribbons to the base or directly to the bottle. It is better to use the first option so that the suit is removable. Why do this was stated above. So, do the following:

The Snow Maiden is made in the same way, only the colors of the ribbons are different, and instead of a hat they make a kokoshnik.
Paint the bottle
If you don't have any time, use other simple methods. The Santa Claus craft from a bottle can be made using regular surface painting.

To do this, do the following:
- If possible, it is better to soak the bottle labels, although this is not necessary. The same applies to degreasing the surface.
- Take red paint and a sponge or wide brush. Cover the surface of the bottle with it. In the case of champagne, up to the top golden label. Acrylic fits well. You can buy a can of white paint and tinting (red for Santa Claus, blue for Snow Maiden). You may have to do more than one layer, or even better, first prime it with white or a special compound. In a word, try to achieve an even colored surface.
- After drying, you create decor: glue on white trim from ribbons, lace, and tinsel. You can even use elements of decoupage, that is, ready-made napkins with decor, stencils.
- Treat the finished product with clear varnish to add shine and greater durability.

Plastic craft bottles: master class
Everyone usually has this material. Depending on the size of the bottle, you can make either a Christmas tree toy or a full-fledged interior decoration.

To create such a souvenir, any of the technologies listed above are suitable.
You can try another quick method. To make a beautiful and neat Santa Claus from plastic bottles, you need to do the following:
- Take a bottle and cover it with paper. This makes it easier to work in the future.
- Wrap the bottle with cloth or a red bag, together with the lid, and secure it with glue.
- Use cotton strands to trim coats and hats.
- Draw a face on cardboard and glue it to the base.
- Make hands from rectangles of fabric. Decorate the bottom with cotton wool in the form of cuffs. Glue the elements to the bottle.
- All that remains is to make the beard and accessories. The gift bag is usually sewn, and the staff is made from a pencil, rod or stick wrapped in satin ribbons. A beard is usually made from cotton wool, but it can even be made from plastic spoons.
Using the same technology, you can make any figurine or even create a plot composition. So, the “Father Frost and Snow Maiden” craft will take its rightful place on your holiday table or under the Christmas tree.
Children will do this with great pleasure. If you may not entrust a bottle of champagne for the holiday table to your child, then you will be happy to give away the plastic “waste” for creative research.
So, you have learned how to make a Santa Claus craft with your own hands from scrap materials. All options are very easy to do. Even a child can cope with this task, so you can turn preparing decorations and souvenirs for the home and gifts into an exciting family activity.
Our favorite holiday is approaching - New Year. We want to create a fabulous atmosphere and festive atmosphere, and creative crafts will help us with this. In this article we will look at: how to make Father Frost and Santa Claus with your own hands.
You will need: foam ball with a diameter of 6 cm, faux fur, chabrak, bias tape, holofiber, hemispheres for eyes, pattern, snowflake sequins, sewing machine, iron with sleeve block, scissors, textile glue, blue crepe satin, white, nude and fleece blue, staff wand, silver braid.
Master Class
- Cut out 2 pieces of the body from chabrak, glue on crepe satin, then finish the long sections with bias tape.

- Place the pieces of crepe satin next to each other and sew long sections with a seam over the edge.
- Form into a round shape using an iron and a sleeve block.
- Cut out the details of the fur coat and handles from blue fleece.

- Sew, turn right side out, and leave holes in the handles for stuffing.
- Cover the ball with flesh-colored fleece and create a neck by wrapping excess fabric with thread.
- Make and attach a nose, then attach hemispheres for eyes.

- Place the fur coat on the chabrak piece, insert the head into the hole in the body, then sew it on.
- Make a hat this way: cut out a rectangle to fit your head from blue fleece, sew the short side and wrap the top with thread.
- Prepare strips of fur for the lapel of the hat and the trim of the fur coat.
- Attach the blue hat with a basting stitch to the head, then sew the fur strip butt to the blue fleece and turn the fur up.

- Stuff the handles with holofiber, sew up the holes, decorate the wrists with fur and sew on the hands.
- Make a beard this way: cut out several rectangles of flesh-colored fleece with a difference in length of 1.5 cm. It is worth noting that the rectangles need to be cut so that the fleece stretches along the long side of the rectangle. Cut the fringe.
- Sew the beard pieces to the head, starting with long pieces and gradually working your way up to the nose.

- Stretch and curl your beard into curls.
- Decorate your fur coat by attaching snowflake sequins.
- Wrap silver braid around the stick to make a staff.
Gorgeous Santa Claus is ready!
You will need: red napkin, template, marker, glue, scissors, paper, printer, hole punch, twine.
Master Class

Santa Claus from a napkin is ready!
You will need: cotton wool, ice cream sticks, red felt, decorative eyes, red pompom, glue gun, flesh-colored paint, brush, scissors.
Master Class

Santa Claus made from cotton wool is ready!
You will need: felt 1 mm thick in beige, white and black, white felt 3 mm thick, thick beige cotton fabric, white felting wool, padding polyester, wire, template, black beads for eyes, black and beige threads, scissors, pencil, glue gun, small bell and other decorations.
Master Class
- Print the template.

- Cut out the body of Santa Claus and transfer it to thick white felt.
- Cut out the body of Santa Claus from felt.

- Cut out the same body part, only from thin white felt.
- Cut the boots from thick white felt, then the same boots from thin black felt.
- Cut out the boot cuffs from thin white felt.

- Draw the mittens and cut them out of thick white felt.
- Cut out parts from thin beige felt - the trim of the fur coat and hat.
- Cut 2 circles according to the template from beige cotton fabric.
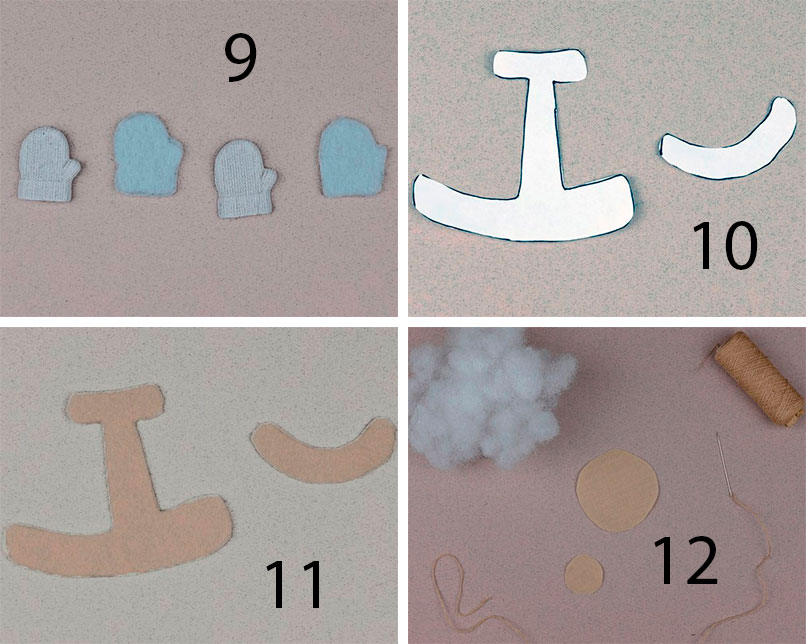
- Make a spout from a small circle: pull the thread, stuff it with padding polyester and sew the spout to the large circle.
- Sew black beads for eyes.
- Sew the face to the body from thin felt. It is worth noting that during sewing you need to add a little padding polyester for volume.

- Make the eyebrows and beard from felting wool, then attach with a glue gun.
- Glue the trim of the hat and fur coat.

- Prepare 4 pieces of wire, twist them onto a pencil, giving them the shape as in the photo.
- Glue the parts of Frost's body from thin and dense felt, gluing wire between them in place of the arms and legs.

- Glue the mittens and boots to the twisted pieces of wire.
- Twist a wire holder for a bell and glue it to the mitten.

- Stitch the Santa Claus figurine with beige thread.
You will need: bottle of champagne, hook, yarn, centimeter, edge, filler, regular threads, needle, doll strands, glue, decorations.
Master Class
- Knit the head with single crochets using beige yarn, according to the principle of knitting a ball. It is worth noting that the number of rows without increases and decreases should be two rows less than for the ball.

- Make the base of the doll from red yarn: double crochet a circle, fold it in half and make knots at a distance, as shown in the photo.
- Knit your arms and torso in circular rows that taper towards the bottom.

- Tie the nozzle onto the bottle from beige yarn and don’t forget to constantly try it on so that it doesn’t fit too tightly.
- Connect the bottom of the nozzle and the workpiece with your hands on the bottle.

- Fill the handles of the red blank and the empty space with filler.
- Dimensions: head circumference 30 cm; arm length 18 cm; body width 30 cm; body height 16 cm.

- Knit and decorate clothes.
- Clothes dimensions: hat blank diameter 10 cm; sleeve length 12 cm; fur coat length 28 cm; sleeve volume 18 cm; fur coat volume 47 cm; The circumference of the finished hat is 32 cm.
- Sew the clothes with regular threads, the sewing lines are indicated in the photo.

- Attach the doll strands to the yarn and secure with glue. Make a beard from long strands, and use shorter strands for your hairstyle.

- Glue the hat to your head.
You will need: red cardboard, flesh-colored paper, 2 openwork napkins, scissors, marker, pencil, glue.
Master Class

Santa Claus from an openwork napkin is ready!
You will need: bright and flesh-colored cotton fabric, white and red fleece, felt, padding polyester or holofiber, combed tape (wool for felting), foam rubber, felting needle, thick and thin wire, glue gun, Moment-Crystal glue, thick cardboard, acrylic paints and brushes, wire cutters, pliers, stationery knife, buttons, beads, beads, floss.
Master Class
- Make a pattern from cardboard: cone with sides 13 cm; circle with a diameter of 6 cm and handles (optional).
- Draw a line through the center of the circle and divide it into 3 equal segments, then make holes for the wire at their joints.

- Place a padding polyester circle and a slightly larger diameter cotton circle on the cardboard circle, then pull the fabric around the cardboard using thread and a needle as shown in the image.
- Bend a thick wire into the letter P, then insert it through the holes in the cardboard, padding polyester and fabric.
- Bend the ends of the wire so that you get feet.

- Prepare a piece of thin wire 25 cm long and screw it to a thick wire, then glue it with hot glue. At this stage, make sure that the structure is stable.
- Prepare 2 pieces of cotton fabric 22 cm long and 4 cm wide. Fold in half lengthwise, sew, turn out, pull over the legs and sew with a blind seam to the bottom.
- Make a cone pattern from flesh-colored fabric, fold it in half, sew, leaving 2 mm of the tops unsewn, fold the edge around the circumference, baste and turn the cone out.
- Place the cone on a thin wire, bringing the end out through the hole in the top. Stuff the cone with holofiber so that the wire is in the center of the body, then sew the folded edge to the body around the circumference with a blind seam.
- Cut out large feet from cardboard, then hot glue them to the wire feet.
- Cut the boots out of foam and make a recess in the back for the ankle wire, then attach them.

- Cut 2 ovals from red fleece, cut a triangle at the top, cover the foam boots, sew the heel with a blind stitch and pull the fleece around the cardboard sole.
- Cut 2 felt ovals slightly larger than the cardboard sole, hot glue them to the sole, trim off the excess and sew the felt to the fleece with a blind stitch.
- Mark the lines for the top of the jacket and the bottom of the cap on the cone, then roll a padding polyester ball, cut a circle from the fabric, pull it along the edge and sew the nose in place.
- Draw a face to your liking.

- Cut the red fleece jacket into a truncated cone shape, fold it in half, sew along the edge, then turn it inside out.
- Sew handles and gloves from red fleece and cotton fabric as shown in the image.
- Pull the jacket over the body-cone and sew at the bottom and along the neck with a hidden seam.
- Cut out figures from felt - Christmas trees, houses, then glue them with Crystal glue and only then sew them on as desired.
- Sew a white fleece snowdrift ribbon with a hidden seam and decorate the composition with beads and buttons.
- Cut boot cuffs and cuffs from white fleece, fold in half, sew along the edges, stretch over the arms and legs, then hand sew. Make a wavy collar in the same way.

- Sew the arms to the body using a button fastening: pull the thread a little, tie a knot and glue it with Moment.
- Tear 10 cm of wool from the combed strip, gather it into a bun and felt the beard with a felting needle.
- Tear off a bunch 2 times thinner and 2 times longer, then roll it in place of the mustache.
- Tear off 2 more bunches as for the beard, then roll on both sides of the face.
- Felt the hair on the sides and back of the head in the same way.
- Cut out an elongated and narrowed cap from cotton fabric based on half a cone, sew it together, leaving a hole at the top.

- Turn it inside out and put the cap on, bringing the wire through the hole and sew it along the edge to the head. Bend the end of the wire into a loop.
- Make a pom pom and flap out of white fleece, then sew them on.
- Make a small felt Christmas tree and glue it to the hat as a decoration.
You will need: red and white colored paper, scissors, glue, marker, pencil, wooden bead.
Master Class

Santa Claus from a plate
You will need: paper plate, colored paper, scissors, glue, marker, printer, eyes, hole punch, rope.
Master Class

You will need: box, colored paper, scissors, glue, marker, pencil, button, eraser, envelope.
Master Class

You will need: plastic bottle, paints, colored paper, pompom, scissors, buttons, 2 bushings, glue, cotton wool, white and black lace.
Master Class

Santa Claus from a bottle is ready!
You will need: white and red paper, scissors, template, printer, pencils or markers.
Master Class

Creative grandpa is ready!
You will need: cotton pads, plastic spoon, glue, red yarn, buttons for eyes, ribbon or thread for hanging, red felt-tip pen, scissors.
Master Class
- Take a cotton pad.
- Fold its side into the center.

- Make cuts along the edge of the circle.
- Draw a smile with a felt-tip pen.
- Take a plastic spoon.

- Apply glue to the spoon, leaving the tip without glue.
- Wind the yarn tightly.
- Apply glue on both sides to the tip of the spoon and glue the face of Santa Claus to the convex part.

- Glue a clean cotton pad onto the concave part of the spoon.
- Cut a circle out of a cotton pad and glue it onto the tip of a spoon handle.
- Cut a circle from a cotton pad, color it with a felt-tip pen and glue it as a nose.
There is no doubt that Santa Claus is the main character of New Year's celebrations. It is his miracles and gifts that children wait for, they send letters, postcards, and under the tree for the fairy-tale wizard, a return gift for children is often hidden - a New Year's craft. Santa Claus himself often becomes a character, embodied in various types of creativity.
DIY origami
A person who is interested in origami will have no questions about how to make small paper figurines in the form of Santa Claus. By choosing the simplest and most understandable option among the proposed schemes, even a person inexperienced in this type of creativity can make a New Year’s figurine out of paper. Santa Claus, created with your own hands from a small piece of colored paper, will be an excellent addition to the main gift or card, and will also be a wonderful sign of attention.


Felt crafts
Felt is a very practical and convenient material for creativity. Felt toys are not only colorful and pleasant to the touch: due to the fact that the pattern pieces can not only be sewn, but also glued to each other using hot glue or an adhesive stick, the creation is also suitable for children.
In order to make a felt Santa Claus with your own hands, you will need:
- red felt:
- flesh-colored felt;
- white felt;
- white floss;
- needle;
- padding polyester or cotton wool;
- pencil;
- scissors.

Work progress (step by step):
- Print or redraw the product pattern on paper, cut out the details.
- Bend the red felt in half, use a pencil to transfer the largest part of the pattern (in the form of a drop) onto it and cut it out. Sew both parts of the part together, leaving a centimeter section unstitched. Through the resulting hole, fill the product with padding polyester or cotton wool (for convenience, you can use a pencil), and then sew up the hole.
- From flesh-colored felt, cut out 1 piece in the form of an oval. This is the face of the future figure. Having placed the part in the desired place, place white felt parts on top of it: the beard and the frill of the hat. The frill should be sewn around the entire perimeter, and the beard should be sewn only at the point of contact with the figure’s face.
- Cut out the remaining parts from white felt: mustache and pompom of the hat (2 pcs.). Sew the mustache over the beard, stitching the piece only along the top edge.
- Cut a small circle (nose) from flesh felt and sew it on top of the mustache.
- Place the end of the Santa Claus hat between two pompom pieces and sew them together.
- Embroider or draw eyes. Fasten the thread in the form of a loop.


Various decorative elements will decorate and diversify the craft. Santa Claus can be made not only in the traditional red and white color scheme, but also have a blue or green suit.
Bottle decoration
It's no secret that the most universal New Year's gift for people in close social circles is champagne (or other alcohol) and chocolate (or candy). The original Santa Claus, hand-sewn from colorful materials, will make the gift unique and memorable.

Making crafts from bottles is also suitable for younger groups of kindergarten: to do this, simply fill transparent bottles with red paper, glue a cotton wool beard and plastic eyes on top, and complete the image of the main New Year's wizard with a red sock or paper cap that imitates the character's hat.


Crafts made from cotton pads
Cotton pads and cotton wool are the easiest materials to use in kindergarten. Children can glue cotton pads (or balls) onto templates prepared in advance by adults or make a craft entirely with their own hands, first painting it and then decorating it with cotton wool parts. These can be snowflakes cut out with a figured hole punch, the cotton beard of Santa Claus, as well as details of his costume.

Identical templates, decorated with details from cotton pads and cotton wool in accordance with the tastes and skills of each child, will become wonderful and different gifts that children can take home and give to their loved ones.

For creativity in older groups of kindergarten, more painstaking and complex work is suitable - creating crafts from cotton swabs. Sticks attached with glue will be a good building material for creating fabulous winter landscapes.


Santa Claus made of plasticine
For children in older groups of kindergarten, as well as for younger schoolchildren, modeling from plasticine will be easy. Depending on the child’s skills, you can choose step-by-step instructions for products of varying degrees of complexity: from the simplest to figures with a large number of small parts.
Santa Claus made of plasticine will become the main character of fabulous winter scenes and New Year's stories.


Figures made from threads
Creating a fairy-tale character from woolen threads is a labor-intensive process that requires not so much special handicraft skills as it takes a lot of time and painstaking work. However, the resulting figurines have a very “homey” look, evoking a feeling of coziness and warmth.


Santa Claus made of paper
Paper crafts are extremely diverse not only in type, but also in the types of techniques used in the process of creating them. Paper of only two colors (green and red), rolled and fixed in the form of cones and complemented with small details (a face with a beard, Christmas balls) will become the basis for creating a beautiful one in the form of Christmas trees and Santa Claus. This idea is perfect for sharing creativity with a large number of children.


Templates printed on plain paper or redrawn and cut out of cardboard depicting the New Year's wizard, as well as his beautiful granddaughter, will give the child the opportunity to prepare small and different gifts for their loved ones.


It might be useful to read:
- A typical story, or why do young parents get divorced?;
- How to make claws from paper and other scrap materials How to make wolverine claws from paper;
- Sex and gender differences;
- DIY Santa Claus from a bottle: master class;
- Everyone is walking: Eid al-Adha is starting to be celebrated in Crimea;
- PKF success Sizing for girls;
- What really happened?;
- Expiration date of sunscreen after opening;