DIY rag doll: pattern and tips for beginners. Rag doll Alina How to make a Russian folk doll with your own hands from fabric
Not only children, but also adults are interested in dolls. They can be bought not only in the store, but today handmade dolls are widespread and they are even more popular than store-bought ones. They can be made from various available materials, and special ready-made kits are sold for sewing dolls. In general, this is a very exciting and interesting activity to create a doll with your own hands. Such dolls will be interesting both for children's games and for interior decoration, and there are also special connoisseurs of doll art - doll collectors. Therefore, dolls can be created for different categories of people and for different purposes, and all of them will be in great demand.
You can make dolls with your own hands from nylon, textiles, felt, felt and other fabrics and materials. Today we will look at master classes on fabric dolls made from textiles.
See material for making dolls here - http://ali.pub/3jp0hs
This seller is relatively inexpensive and has a lot of positive reviews.
Also watch master classes with felt doll patterns
I have long dreamed of a handmade textile doll and therefore I want to collect clear and detailed master classes for my piggy bank, so that when the time and opportunity arises to create a doll with my own hands, all the necessary patterns, templates, step-by-step lessons and various secrets for making them will always be at hand. hand for easy searching.
I had to wander through the nooks and crannies of the Internet to find clear master classes. I don’t have links to the artists, but you can recognize the author from the photo; many are signed.
Templates with a doll pattern. Do-it-yourself tilde dolls, step-by-step master classes.
The template can be saved to your computer and resized in any editor as you wish. You can print the template or attach a white or translucent sheet of paper to the computer screen and, using a pencil, lightly transfer all the parts of the doll onto the sheet, then cut out the doll’s parts.

We transfer all the details onto the fabric in the required quantity, do not forget about seam allowances, and calculate the size of the parts in advance.

All parts are cut out very carefully and also carefully stitched so that all the bends are even and look beautiful from the outside.
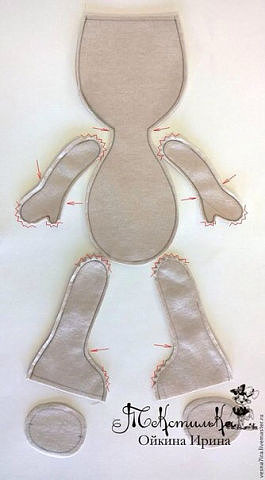
A small hole is left on all parts so that they can be turned out. You can turn them out using any thin and long object.

After turning it inside out, fill the parts tightly with any suitable filler.

Sew up the remaining hole using a blind stitch.

We find the middle on the sole of the foot, mark it and adjust it to the seams on the shin.

We chop off the lower sole of the legs with the shin with pins

Flashing

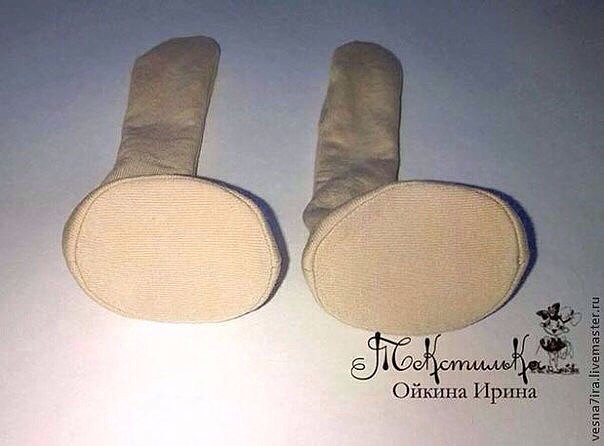
Turn it inside out and stuff it with filling.

The next part of the work is the head; to make it you will need a foam ball; they are sold in handicraft stores of different diameters. As well as a rectangular piece of padding polyester or other filler.

Wrap the ball with padding polyester
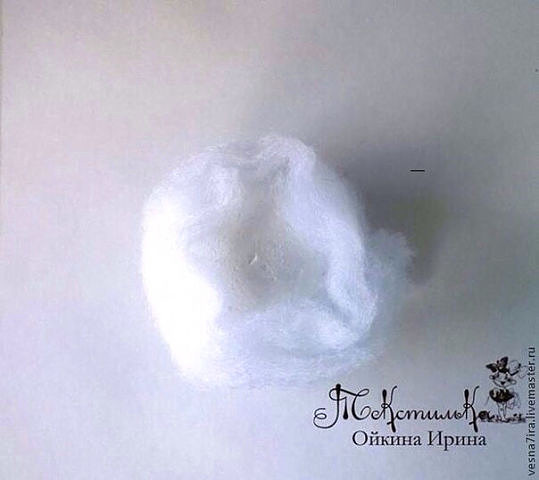
And we put the resulting ball into the cut out part of the head and body, and sew the head on top.

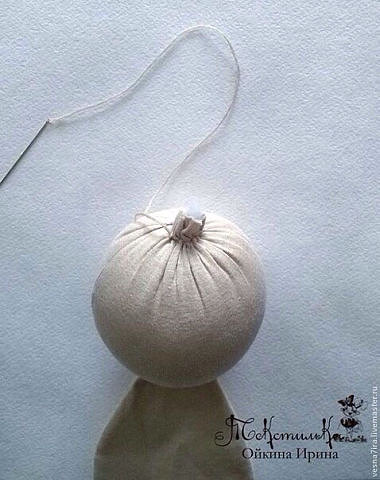
To make the body static, we screw the filler onto a wooden toothpick coated with glue.
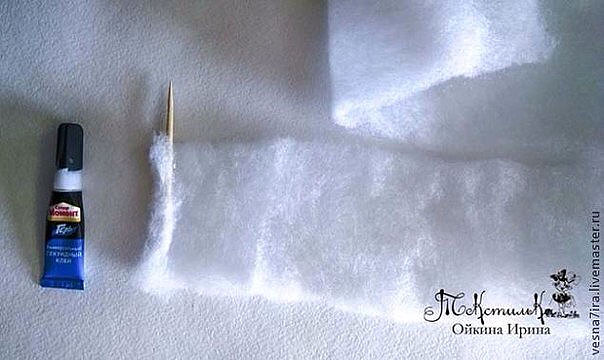
We fold the body pattern and insert the rolled filler inside the body

All details are ready

On both sides you need to mark the same distance where the arms will be sewn.

In order to sew the parts to the body we will need small buttons.
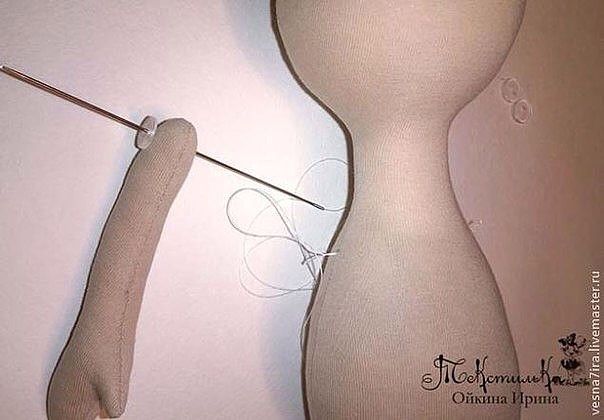


The legs are stitched in a similar way

For centuries, people have created rag dolls and amulets with their own hands. Such dolls were supposed to protect family members from adversity and illness, bring happiness and prosperity to the house, and protect them from evil spirits. they were created from natural materials and improvised means, they were cherished, loved, and passed on from generation to generation.
[Hide]
What are amulets dolls and what is their function?
A small doll made of fabric, thread, straw or herbs, dressed in beautiful, embroidered clothes, was not intended for children's play. Only a woman could make a doll-amulet, as the continuer of the family and the keeper of the hearth; men were not allowed to do such a thing.
Craftswomen tried to create a doll without using sharp objects - scissors, knives or needles (needles were allowed when embroidering doll clothes). Another important condition is that the doll should not have a face so that evil spirits do not enter it through the eyes.
Such amulets-dolls helped in difficult life situations; they can be roughly divided into several groups:
- guardians of the home and family hearth;
- guardians of the life and health of children and adults;
- guardians of pregnant women and babies, assistants in childbirth;
- bringing good luck, prosperity, wealth;
- patrons of crafts, trade, agricultural work, good harvests;
- guardians of warriors and travelers;
- protectors from evil spirits and evil spirits;
- dolls for fortune telling.
Slavic
Girls began sewing their first amulets dolls with their own hands in childhood under the guidance of their mothers and older sisters. By the time she got married, the girl already knew how to make such amulets for various needs. The future bride also had in her dowry chest several dolls for her future home and new family. The experience of creating amulets dolls was passed down through the female line, from mother to daughter.
The main Slavic doll amulets and their meaning are given in the table:
| Name | For what occasion was it made? | What did the doll look like, what materials were used to create it? | The meaning of the amulet doll |
| Bereginya | For birthdays, weddings, housewarmings | Red threads and red shreds | An assistant to a woman in household chores and childbirth. Guardian of the house from evil spirits. |
| Grace | April 7 or Christmas (as a gift) | Birch or rowan tree. She was depicted with her hands raised up. | Brings good news to the house, helps in raising children. |
| Ten-handle | As a wedding gift, the bride could also make such a doll for her own wedding | The doll has 10 hands to keep up with all household chores. | Helping the young housewife with numerous household chores. |
| Ash doll | For a wedding (cooked by a mother for her daughter-bride) | The doll's head was made from soaked ash. The doll had no arms or legs. Often Pelenashka was tied to the ash doll. | A symbol of motherhood and well-being in the home. |
| Kuvadka | For the birth of a child | A very simple motanka doll, shaped like a cross. | They helped the mother during childbirth, protected the woman and the newborn baby. |
| plantain | Before a long journey | A pinch of ash from the hearth was placed in the doll’s bag. | Helped with hardships on the road and brought good luck. |
| Bird Joy | To welcome spring | The doll was decorated with bright ribbons, feathers, and bows. | She took part in the ritual holidays of the invocation of spring. |
| Comforter | For small children | A stuffed motanka doll in the shape of a soft, fat woman. | The doll was given to the child only when it was necessary to console him. Didn't serve as a child's toy. |
Russian national
Russian folk dolls are closely related to national traditions and rituals. Ritual dolls were prepared for certain holidays, after which they were destroyed or stored until the next holiday.
The following dolls were made from:
- fabrics;
- thread;
- wood;
- clay.
There are three main dolls:
- Kupavka - a doll was prepared on the day of the Summer Solstice from two poles fastened in the shape of a cross. Bunches of straw were tied onto poles to create a human-sized doll. The doll was dressed up in real women's clothing - a shirt and sundress, with long ribbons tied to the sleeves. At the end of the Ivan Kupala holiday, Kupavka was released along the river.
- Kostroma (Maslenitsa) - the doll was prepared at the beginning of Maslenitsa week. Just like Kupavka, Kostroma was made human-sized or even larger, and dressed in women's clothing. Kostroma was burned on the last day of the Maslenitsa celebration.
- Easter (Verbnitsa) - the doll was prepared a week before Easter, on the eve of Palm Sunday. They tried to make the doll without scissors and needles from red scraps and rags. The finished doll was put up in the window for everyone to see, and on Easter it was placed on the table along with Easter cakes and colored eggs.
Kupavka Kostroma (Maslenitsa) Easter (Verbnitsa)
Rules for creating amulet dolls
When making amulets dolls, you should follow the following rules:
- Start work in a good mood. Remember that the doll absorbs part of the energy of the craftswoman, so you should not start working on the doll in a state of irritation, fatigue or illness.
- There should be no men or grown-up boys near the craftswoman. An exception may be young boys, but they should not distract the craftswoman.
- Create a doll not on the table, but on your lap. Cover yourself with a scarf to prevent hair from accidentally getting into the doll.
- Do not touch the doll with sharp objects (scissors, knives, needles) or glue. Clothes should be sewn separately and then put on the doll.
- Try to make the doll before you go to bed.
- Use natural materials without dyes to create a doll. This can be cotton and linen fabrics, matting, threads, ropes, ribbons, straw, etc.
- Finished dolls cannot be washed or thrown in the trash. If you need to get rid of a doll, it should be burned, buried in the ground, and floated down the river.
- The very first doll should be made for yourself and left in your home.
Instructions for making dolls
Motanka - from the word to reel. This is a doll made from scraps, all the elements of which are wound with a long thread. The thread cannot be cut, no knots can be made, only one knot is allowed in the navel area. When wearing a motanka, you must wear a long shirt, skirt and headscarf. The face cannot be embroidered or drawn; you should either leave a clean piece of fabric or tie the face crosswise with threads. 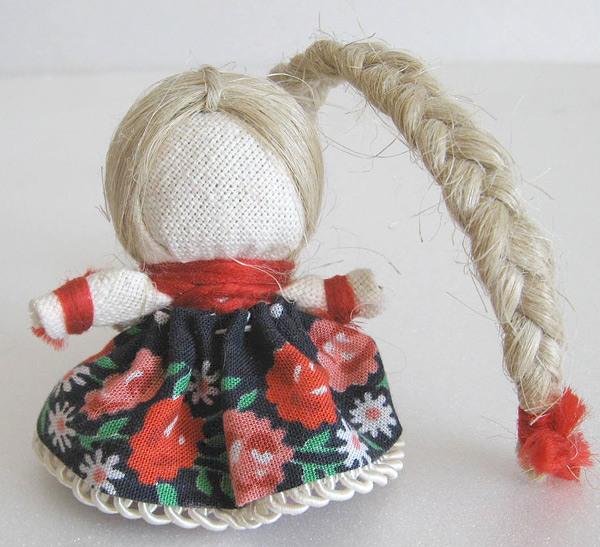
- two pieces of white fabric 10x10 cm;
- scraps of colored fabric;
- hair yarn;
- spool of red thread;
- synthetic padding tape for the head;
- ribbons, braid, lace for decorating and finishing the doll.
Step-by-step instruction:
- Roll a white piece of thick fabric tightly into a tube. These will be the doll's legs.
- For the shoes, we cut out two 5x5 cm squares from a colored scrap. We apply each square to the opposite ends of the tube and wrap it around them. We fix it with threads.
- Fold the tube exactly in half, step back 2 cm from the fold and wrap it with thread.
- Wind the padding polyester tape onto the fold marked with threads. This will be the head.
- Place the head in the center of the white flap, fold the fabric evenly around the head and wrap the threads around the neck.
- Make handles from the right and left corners of the flap by tucking the fabric inward. Secure the ends of the handles with thread.
- Make a body from the front and back corners of the flap, tying it with thread.
- Wind the yarn onto a book of suitable width. The thicker the winding, the more magnificent the doll's hair will be.
- Cut the winding at one end and tie it with a piece of yarn at the other.
- Place your hair on your head, spread it evenly and tie it around your neck with a thread very tightly. Braid your hair.
- Measure the height of the doll and sew her a sundress from a colored scrap. Put it on the doll.
You should always cut out and sew clothes for a doll separately so that the needles do not touch the doll’s body.
Watch how to make a motanka doll “Happiness” step by step in the video of the AllatRa TV Dnepr channel.
Metlushka
The Broom doll will sweep away all quarrels and troubles from the house. Such a doll was hung in the kitchen, right above the front door. If the doll fell from its place to the floor, it was believed that it had fulfilled its purpose, and a new Broom should be made.
Metlushka doll
To make a doll you will need:
- small broom (buy or make yourself);
- 2 square pieces of white fabric (size depends on the size of the broom);
- colored fabric (for sundress, scarf and apron);
- red ribbon;
- spool of white thread;
- spool of red thread;
- yarn.
Step-by-step instruction:
- Wrap the yarn around the broom handle to form a round head.
- Wrap the white piece around the head and wrap it with white thread.
- Make a slit in the center of the second white flap and place it on the broom. Form the doll's arms, securing them with red thread.
- Separately sew a colored sundress and an apron and put it on the doll.
- Cover the head with a scarf and decorate with ribbon. The Metlushka doll is ready.
When creating the doll's head, try to keep the face smooth and even, without folds or wrinkles.
Photo gallery
In the photo you can see how to make a Metlushka doll step by step.
Valdai doll Bell
To make a doll you will need:
- 3 round pieces with a diameter of 15, 20 and 22 cm (1 red and 2 multi-colored);
- 1 white piece 12x13 cm;
- 1 multi-colored patch for a scarf 15x15x21;
- small bell;
- a piece of cotton wool or padding polyester;
- red thick threads;
- red ribbon.
Step-by-step instruction:
- Roll the cotton wool or padding polyester into a ball and secure the bell to it with a thread.
- Place the bell-shaped cotton wool in the center of the largest round patch.
- Wrap the fabric around the bell cotton to form a head. Secure with thread.
- Wrap the second largest scrap around the first and also secure with thread.
- Wrap and secure the third flap in the same way.
- Lay out a white rectangular piece of fabric, fold the corners towards each other.
- Attach the flap to the head, carefully crumple the fabric so that it does not wrinkle on the doll’s face. Secure with thread.
- Form handles by folding the long ends of the white fabric inward. Secure the ends of the handles with thread, stepping back a little from the edge.
- Tie a scarf. The Bell doll is ready.
Small bells can be purchased at a fishing store.
Photo gallery
Amulet doll made of linen threads
To make a doll you will need:
- undyed linen threads;
- red wool threads.
Step-by-step instruction:
- Take a thick book or box, about the height of your palm. Wind threads around it for three parts of the doll: the thickest for the body, 2 times thinner for the arms and for the pigtail.
- Cut the windings on one side. You should get three bundles of thread.
- For the handles, braid them and secure with red thread. Cut the braid on the other side and also secure with thread.
- Measure 1 meter of red thread. At the body, mark the head by tying it in the middle of a long thread.
- Tie the braid bun at one end with a knot, pull it through the head and secure it to the top of the head. Braid the braid and tie the end with thread.
- We insert a pigtail-handle into the body, fasten it crosswise with the ends of a long thread, and then tie it on the belt, leaving a belt.
- Tie the doll's head with a headband of red thread. The doll is ready.
Well-being
The Prosperous doll is the first assistant for the housewife; she will also take trouble away from the house, and will attract prosperity and well-being to the house. These dolls were given as gifts for weddings and housewarmings.
Blessed Doll
To make a doll you will need:
- white flap 10x10 cm (for the head);
- colored scrap 15x5 (for handles);
- a colored piece of round shape with a diameter of 12 cm (for a skirt);
- colored piece of triangular shape, 18 cm on the long side (for a scarf);
- ribbons (for an apron and belt);
- spool of white thread;
- cotton wool for filling.
Step-by-step instruction:
- Place a ball of cotton wool in the center of the white piece, wrap the fabric around it and wrap it with thread. The head for the doll is ready.
- Fold the strip for the handles in half and fold the edges inward. You should get a narrow four-layer strip of material. Tie a knot in the middle.
- Tie the handles with threads to the doll’s neck, raising them above the head.
- Gather the round scrap along the edge with a simple seam to create a pouch. Place a coin and cotton wool inside.
- Insert the head with handles into the bag. Tighten the thread and additionally wrap it around the doll to hold it tighter.
- Lower the doll's arms down, tie her an apron, a belt and a scarf. The Well-Being doll is ready.
Photo gallery
Swaddlers
To make a doll you will need:
- 2 white scraps 20x30 for the body;
- multi-colored scrap 25x25 for a diaper;
- red rag 10x10 for a scarf;
- red wool thread;
- beautiful lace.
Step-by-step instruction:
- Place two white pieces on top of each other, fold in half, then in half again and roll into a tight roll. Tie the roll with red thread. This will be the body of the doll.
- Fold the red piece in half and put it on like a scarf on the body.
- We lay out the flap for the diaper on the table. We bend one corner to the center and place the body on the diaper.
- We fold the diaper on the left, and then on the right.
- We bend the bottom edge of the diaper and lift it up.
- We tie the doll with a string. The Diaper doll is ready.
Photo gallery
Bunnies dolls
To make a doll you will need:
- a piece of colored fabric 10x20 cm;
- cotton wool or synthetic winterizer;
- red threads.
Step-by-step instruction:
- Fold the fabric in half along the short side of the flap. Fold it into a corner, wrap it with thread three times and tie a knot (do not cut the thread). These will be Bunny ears.
- Roll a thick ball of cotton wool and insert it under the Bunny's ears. Cover with a cloth and wrap the neck with the same thread, forming a head.
- We wrap the remaining fabric inward, bend it 1 cm from the edge and tuck it under the neck. We wrap the same thread crosswise, forming paws. The doll is ready.
Step-by-step diagram for creating a Bunny doll
In the video you can watch a master class for beginners on making a “Bunny” doll. Filmed by the channel “U-mama. ru".
Lovebirds
Lovebirds - a man and a woman holding hands tightly - a traditional Slavic wedding talisman. Lovebirds were prepared on the eve of the wedding, and during the wedding they were hung under the arc of the horse carrying the newlyweds. Then the doll was kept in the young family, protecting marital love and fidelity in the house.
Lovebirds
To make a doll you will need:
- a thin, even stick about 30 cm long;
- a piece of white fabric 15–40 cm (for a stick);
- 2 pieces of white fabric 20x40 cm (for a woman’s torso) and 20x20 cm (for a man’s torso);
- 2 pieces of red fabric 15x30 cm (for a woman’s shirt) and 15x20 (for a man’s shirt);
- striped or colored patch 20x30 cm (for pants);
- multi-colored patchwork 20x20 cm (for a scarf);
- a dark-colored patch 10x10 cm (for a hat);
- braids and ribbons;
- padding polyester;
- beautiful fabric for an apron;
- a spool of thick red thread;
- wire and pieces of leather for boots (you can use cut off fingers from old leather gloves).
Step-by-step instruction:
- We wrap the stick in white fabric and secure the fabric with thread on both sides. These will be the doll's hands.
- Fold the white fabric 20x40 in 4 times, tucking it inward. You should get a long narrow strip. We fold it in half, stepping back a little, and tie it with red thread, outlining the head. We fill our heads with padding polyester. The body for the female figurine is ready.
- We put the body to the arm and fix it with a thread crosswise. We make the torso for the male figurine in a similar way - we fold the flap for the pants 4 times, tucking the fabric inward.
- We attach the pants to the hand and tie them with thread from the bottom. From a white 20x20 piece of paper we make a head for a man in the same way as we did for a woman. Stuff it with padding polyester and secure it with thread on your hand.
- We fold the red scraps in half and make simple patterns for shirts for women and men.
- We cut a hole for the head and put it on the dolls.
- We secure the shirts with beautiful braids or ribbons. We also put on an apron for the woman.
- We insert a wire into the boots and secure them with threads on the man’s feet.
- We tie a ribbon around the woman's head and cover it with a scarf. We apply the flap for the hat to the man’s head, wrap it around and bend the edges inward at the back of the head. Secure with braid or tape.
- We tie a thread to the Lovebirds so that they can hang them. The Lovebirds doll is ready.
Photo gallery
Krupenichka
To make a doll you will need:
- canvas or linen fabric 20x20 cm (for the body) and 7x20 (for the arms);
- wide lace ribbon 10 cm (for the undershirt);
- a flap along the width of the lace ribbon (for the outer shirt);
- a small piece of soft, plain fabric (for a warrior on the head);
- a piece of beautiful fabric 40x40 (for a scarf);
- embroidered apron;
- needle and thread;
- any cereal or mixture of cereals.
Step-by-step instruction:
- We sew an oblong bag from a 20x20 flap, pour the cereal into it and carefully sew it up or tie it in a knot.
- Wrap a lace ribbon around your waist and wrap it with thread. Attach a piece of the top shirt with a thread on top, leaving a gap between the edges 2-3 cm wide.
- We wrap the head with a soft piece of warrior cloth, hiding the sewn end of the bag under it.
- We twist a long strip of fabric on both sides with the wrong side inward. Then we lean the doll against the back so that the twisted arms are at shoulder level. We fix everything with thread.
- Using the same thread we attach the apron to the body.
- We tie a scarf so that the upper edges of the handles are hidden under it. The Krupenichka doll is ready.
Herbalist
The herbalist protected the health of all family members. Such a talisman was made for a sick person; often the doll was given to children to play with. This is not without reason, because the Herbalist is filled with medicinal herbs (chamomile, mint, lemon balm, St. John's wort, thyme, etc.) that help improve health, a kind of aromatherapy. The herbs in the doll need to be changed once a year.
Dolls made from rags, from leftover fabric - what could be simpler? At the same time, this is a whole world, very ancient, very bright and beautiful and with its own traditions. For centuries, dolls have been not only and not so much toys for children, but sacred symbols, things that carry a secret meaning and help people. It was believed that amulets would protect against damage and the evil eye, preserve peace and harmony in the family, and protect against illness and poverty. This is how folk dolls have survived to our times. Now there are many other dolls that resemble funny kids, girls and boys, and fairy-tale characters. Children really love such toys, warm and funny, made by their mother or grandmother. A rag doll accompanied a person from birth until death. A pregnant woman created such a doll for her unborn baby with the warmest words and wishes. Mom gave her daughter such a toy as a talisman, and she took it to her new family when she got married. It was believed that this was my mother’s help, that this help would be useful in a foreign place and would help to cope with troubles. A wife could give her husband, who was leaving to work or go to war, a doll on the road, which, it was believed, would not only save him, but would also remind him of his beloved wife and family in distant lands. We will show you patterns for a finished rag doll, which is so easy to make with your own hands!
A rag doll is not that difficult to make. It is important to correctly transfer the work with the pattern onto the fabric with your own hands, carefully, and most importantly, with love, cut and sew. Such products are suitable for everyone, even a novice craftswoman. If you make such a doll, you will get a wonderful gift or an interior toy in a folk style.
Folk dolls are very diverse. They were usually made from scrap materials; toys made of birch bark, tied with rag scarves, from grass or straw, which the mother could make for the baby right in the hayfield or in the barn, tied with threads and fastened with birch bark, were popular. Therefore, making rag dolls with your own hands involves various actions. Some toy ladies require working with a needle and thread, while others simply require winding fabric, which must then be deftly tied with thread. Such dolls were popularly called “motanki”; girls from the age of five knew how to twirl them.

We sew a rag doll with our own hands in a simple master class
A master class on Russian rag dolls with your own hands will show and explain how to quickly and easily make both a symbolic ancient doll and a funny gift for a child.
Necessary materials:- A small piece of cotton or linen fabric for a skirt (42 x 20 cm)
- Strip for warrior (5 x 22 cm)
- Cotton wool for stuffing (if the craftswoman wants to achieve authenticity and identity, then she will need straw or sawdust, but they should be small enough)
- Handkerchief (35 x 15 cm)
- Linen fabric for a shirt (24 x 22 cm)
- Two red patches (10 x 10 cm)
- Red threads
- Shreds of coarse linen (18 x 38 for the body, 32 x 17 for the legs, 26 x 14 for the arms)
Place a small piece of cotton wool in the center of the flap for the body, form a head and tie it with thread. In the same way, make two red balls - the future breasts of the doll.
Make a hem at the scraps for the arms and legs, roll them into tubes, and wrap the ends with red thread. This fastening had a sacred meaning. Red color - a symbol of fire, love and strength - is not without reason the color of the fastening thread. After all, brides walked down the aisle not in white, but in a red sundress and scarf.

Now the arms and legs need to be tied to the body. We wrap the handles so that we get a cross on the chest - it’s more reliable.
The legs are also tied to the body. Not all folk rag dolls had legs. Often, since puppetry was quite abstract and schematic, the absence of legs was hidden by a long hem.
It turns out to be such a little man.

Now it's time to tie the doll's chest.
Folk rag dolls had no faces. And this is by no means a lack of colors - after all, many natural materials could serve for this. The fact is that the image of the eyes was considered sacred. Our ancestors believed that along with the eyes, the soul entered the body of the doll, and thus evil forces could enter the toy, and, therefore, the house. Therefore, rag dolls historically lack eyes, noses and mouths. Of course, if there is a desire, the craftswoman can draw them at her own discretion.
We are making a shirt. We fold the square intended for it in half. From each corner we cut a 5 x 5 cm square and make a cut up to the center diagonally from the corners of the squares. We make a hole in the center for the doll's head.
We put on a shirt. We bend the sleeves and tie them at the palms with red thread.
We fold the shirts and tie the thread with a cross from the head to the waist.
We gather the skirt around the body, gather it together and tie it with a thread in the same way.

We put on a scarf and tie it at the back.
We tie the apron so that its upper end is tucked inward.
And now it’s the turn of the scarf. It must be tied around the neck, the ends back.
It would be great if the doll also had a belt. After all, Russian beauties did not appear without him!

Video lessons on the topic of the article
A video on how to make a rag doll with your own hands can be found in the selection below.
Traditional folk doll
Amulet doll for happy motherhood
Master class with step-by-step photos “Traditional folk amulet doll for happy motherhood”
The master class is intended for middle-aged and older children, educators, educators, and anyone who is passionate about folk dolls and its history.Performed: Lapteva Svetlana Khristyanovna, teacher, State Budgetary Institution of the National Social Organization “Social Rehabilitation Center for Minors”, Tatarsk
Purpose: It can be a touching gift for friends, family and loved ones; it can be solemnly presented to a newlywed couple with the best wishes of love, care, fidelity, and service to your family.
Target: create a traditional folk doll-amulet for happy motherhood.
Tasks:
- teach how to make a rag folk doll using traditional technology;
- to introduce Russian folk traditions through familiarity with twisted dolls;
- cultivate love for folk culture, veneration and respect for folk traditions;
- instill skills of work culture and accuracy;
- cultivate a caring attitude towards the objects of your work.
Today, the problem of preserving and caring for folk culture is acute. And we must strive to ensure that the younger generation knows the traditions and customs of the Russian people, the history of folk culture, and can be imbued with a sense of understanding of its antiquity and greatness, in order to become familiar with its origins. The source of such a heritage for our children can be a traditional folk doll, which has been undeservedly forgotten.
Rag dolls originated from ritual figurines associated with the veneration of female deities, cults of fertility, ancestors and the hearth. Ash, grain, linen tow, and rags were used to stuff a rag doll. Stable characteristics of rag dolls were passed down from generation to generation: simple design, pronounced female characteristics (breasts, long braid), facelessness. A doll without a face was considered inaccessible to the infusion of evil forces into it. An important detail of the doll was the breast - a reminder of its connection with the cult of fertility and motherhood. The doll became a talisman. Masters created dolls for their families. Toys not only entertained the child, but also introduced him to everyday peasant labor.
By creating a toy on their own, children learned to work with different tools, acquiring skills and giving free rein to their imagination. Playing with homemade dolls, the girls learned to spin, sew, and embroider. The dolls were taken care of and passed down from generation to generation. Thanks to a rag doll, a child from a very early age learned the meaning of a woman-mother, her function to give life, feed, educate in strict love, and pass on traditions. The image of the doll was real and recognizable. He reflected typical characters and professional interests. This is how respect for the family’s way of life and interest in culture were fostered. A doll was considered the best gift.
Making a doll itself has a healing effect - it helps you relax your soul, feel the joy of the beauty being born in your hands. Our great-grandmothers knew how to make dolls that brought good luck to the house, comforted children, and drove away illnesses.
By making traditional dolls, we plunge into the mysterious world of our ancestors, into women's secrets - the secrets of motherhood. It turns out that in this simple activity you can discover depths that you don’t even suspect about, secrets that have come down to us from the depths of centuries.
A talisman for happy motherhood, presented in the form of a doll with babies.
The amulet in the image of a woman with a baby in her arms was considered very strong and was always given with wishes of well-being, peace in the family and in the soul, a calm, joyful and confident existence. It symbolized a woman who got married and had children. And the ability to give birth was especially significant for our ancestors. The joy of being a mother reflected that such a woman was doing well. The doll was created when they wanted or were already waiting for the baby to appear. They also gave it to weddings with wishes for healthy children, for the birth of a new family, to especially honored guests, when they wanted to show respect.
This doll, which has come down to this day from time immemorial, is a wonderful example of folk art that educates and makes you think.
Let's prepare the necessary materials and tools.

To complete the work we need:
- coarse cotton fabric;
- pieces of multi-colored and colored fabric;
- canvas;
- lace:
- red floss threads;
- scissors;
- padding polyester;
- needle.
We do a twist. To do this, take a piece of cotton fabric measuring 30/38 and fold the fabric in half.

We twist the column tightly and evenly. The height of the column will be = 15 cm. We tie the column with red thread along its entire height.

We round the head a little with padding polyester and mark the neck with threads.

Take a square of coarse cotton fabric measuring 20/20 cm

We place a square of plain fabric on the head.

Secure with red thread along the neck line.

Now let's make the hands. Fold the corner 1-1.5 cm.

Fold the edges towards the middle.

At a distance of 1 cm from the edge, we make the doll’s palm and pull the fabric with thread.

There is no need to cut the threads after tying.

We tie it tightly with thread at the doll's waist.

Let's make a skirt. Take a piece of colored fabric measuring 12/30 and make a stitch and a small gather along the top edge.

We wrap the doll with a skirt patch, right side inward.

We tie it tightly with thread along the waist line.

Turn it right side out and straighten it.

We take a piece of canvas and make an apron out of it, pulling out the threads along the edge.

We’ll embroider a simple design on the apron, but you don’t have to do it.

We fix the apron. We place it in the middle of the skirt, with the front side inward, and drag it along the waist line.

We turn away the apron.

We tie a piece of lace around the head.

We tie the doll's head. To do this, you need to cut out a small triangle-kerchief.

We tie the strings on the doll’s hands. After all, she will need to hold her children.

Making a baby. Take a piece of coarse cotton fabric measuring 10/7cm, twist the column tightly and tie it with red thread. We cut out a scarf from white fabric and fasten it on the baby’s head, as shown in the photo.

Let's swaddle the baby. Take a piece of size 10/13 for a diaper. We swaddle as shown in the photo. We bend the open edges of the fabric inward so that there are no threads and the work looks neat and aesthetically pleasing; we tie it up.
It is difficult to imagine the life of modern girls without dolls. On store shelves you can find “babies” who not only know how to crawl and cry, but even grow if they are fed on time. And the variety of Barbie dolls, which have held the palm in popularity for many years, is mind-boggling. Previously, it was difficult to even dream of such an assortment. Nevertheless, our grandmothers, great-grandmothers, and girls who lived thousands of years ago played with dolls.
How dolls appeared
Dolls have been around for a very long time. Of course, they were not at all similar to modern ones and were created not so much for play as for various rituals. They were made from any available material: clay, animal bones, wooden blocks, straw, stones, even coal. Later, rag dolls appeared. Some of them were intended for children's fun, while others were for serious rituals of adults.
The Slavs, being pagans, animated nature and natural phenomena, believed that everything good has its own good spirit, and every bad thing has an evil one. With the help of dolls, they tried to ward off or deceive evil spirits. With the introduction of Christianity, these beliefs did not disappear, but gradually began to be replaced by new ideas. Now the culture of our ancestors is experiencing a revival. Who knows, maybe a really simple folk rag made will protect us from troubles.
Motanka columns
The principle of making most dolls was the same. The fabric was wound into a roll or column (hence the “reels” and “columns”). Next, the finished column was turned into the likeness of a female figure. The face was not highlighted so that there would be no unnecessary eyes in the house. These rag dolls were made very quickly. The process took from 10 minutes to half an hour, depending on the diligence of the craftswoman and the number of small details that she added to her creation. So, some dolls had breasts, butts, and braids woven from threads. Their clothes were decorated with lace, embroidery, and beads. The butt and breasts were made from a separate piece of fabric, which was also twisted and tied to the doll’s body with threads. Afterwards, a skirt and shirt were put on over these twists. The young lady turned out to be magnificent, portly, just the kind who could bring prosperity and prosperity to the house. In some regions of Russia, the doll's breasts were made differently. We took two identical square pieces. Cotton wool was placed in their centers and tied. It turned out to be a ball. These balls were tied to the doll's body in the appropriate place.
Amulet for baby
For newborns there were rag dolls and swaddles. Their role was to ward off any evil from the baby. It was forbidden to praise the child. Instead, they praised the doll. They said how beautiful and smart she was. People believed that this way evil spirits would “not notice” the baby, and all their nasty things would go to the diaper. Feverish dolls were also akin to them. There were 12 of them made - according to the number of troubles that could happen to a person. Each was given a name, such as Shaking, Bonesbreaker, or Deafness. They made them eye-catching so that evil, upon entering the house, would immediately pay attention to them and stick to them without touching the owners. These dolls were hung near the stove or near the front door.
How to make a swaddled rag doll
Let's take the following:

1. A square or similar piece of white fabric, preferably not very soft. It must be worn and taken from the clothing of a healthy person.
2. A square piece of fabric of any color. This is a diaper.
3. A triangular piece of fabric, preferably light colors. This is a handkerchief. You can also take a square piece and fold it like a scarf.
4. Threads or braid. They should be red as it is the color of happiness, good luck and protection.
Roll the white fabric into a roll. This is the body of a pupa. We tie it with threads in two places, highlighting the head and the place of the umbilical cord. We tie a scarf to the doll, as grandmothers usually do. We wrap the ends of the diaper behind the back. We wrap her in a swaddle like a baby. We also place the bottom edge of the diaper behind the back. We fix all this with threads, pulling the doll crosswise. It is believed that there should be an even number of knots and an odd number of crosses.
Corn dolls

The traditional rag doll responsible for the harvest was called a grain doll. If it was filled with buckwheat, it was a krupenichka, if with wheat or peas, it turned out to be a rich man. Usually they did both at once and placed them side by side. Children were allowed to play with them. In the spring, cereals and grains were poured into the seed, asking the spirit of fertility for a rich harvest. And he did!
The role of the body of the grain is played by the bag into which the grain is poured. It must be sewn with one’s own hand from a piece of new white fabric. They do this in two ways. Some sew together something that looks like a pipe. A round bottom made of the same fabric is sewn to one end, and the other end is tied with braid. Others simply sew the fabric together at the bottom. The bag is filled with grain and tied. The doll's body is ready. You can no longer use the needle. You can tighten the bag with a thread, defining the waist, but you don’t have to do this. The main thing is to dress the doll. Krupenichka requires a scarf, under and over skirts, an apron, a belt and a coat. The rich man is dressed in a shirt, pants (like a dark skirt), a jacket and a hat. Some craftswomen make hands for grains by rolling a white square piece of fabric and tying it to the doll’s body. To highlight the palms, the ends of the “arms” are also tied together with threads. The grains must be dressed up in bright, beautiful shreds.
Beregini

These dolls protected the house from all evil spirits and contributed to prosperity. They were placed in a bag of grain in their hands. The folk rag doll-bereginya is made according to the same principle as all twists.
We fold the body-column. In this case, you need to take into account that the doll should be stable. For the head, take a large square piece of white fabric, fold it like a scarf, marking the fold line. Let's expand. Along the fold we cover one edge of the column with it. Then the two ends of the scarf will be the doll’s hands and at the same time her shirt. To highlight the palms, we tighten the ends of the hands with threads, and straighten the area of the face so that it is smooth. You can put cotton wool on your head, and then put on a scarf-shirt on top. Then the head will be more rounded. To ensure that the cotton wool retains its shape, the doll’s body needs to be tightened with threads under the chin. Often, beregins are given breasts, which are associated with prosperity. Bright shreds are selected for their skirt and apron. Some craftswomen complement their outfits with beads, lace and embroidery. The beregins put a warrior on their heads. This is a kind of frontal bandage. There is already a scarf on top of it. The bag is made from a small piece of cloth and tied to the hand.
Herbal egg capsule
How to make a rag doll so that it protects the house, fits beautifully into the interior and spreads a pleasant aroma? Very simple. The herbalist doll is made like this. You need to take a square piece of light fabric, which will be the head and arms in the shirt. Fold it like a scarf, marking the fold line. Expand. Place cotton wool in the center and tie with thread. This is the head. The other two ends are the arms. Use threads to highlight the brushes in them. Tighten the remaining edge of the square with a thread, highlighting the waist. The breasts are made in the same way as those of beregin dolls. The herbalist's skirt is a large square of colored fabric. You need to place aromatic dry herbs on it, tie it with a bag and attach it to the finished body. Cover the place of the bundle with an apron.
Norwegian beauties

Toni Finanger is a true Norwegian. She lives in a harsh climate, but her character is kind and a little mischievous. These are the features her dolls are endowed with. They are called Tilda. Unlike Russians, Tilda rag dolls can be bears, hares, angels, chickens - anything, not just young ladies. If even a child can make our column, then the production of Tilda requires craftsmanship and sewing skills. These dolls, as a rule, consist of individual parts (body with head, arms, legs), which are sewn together. Some of them have seams on the sides of the body. But most have seams in the middle of the face (muzzle), so the work requires maximum care. After naked Tilda is ready, she is dressed. It's not easy to dress her up. All elements of clothing and shoes are cut out, carefully sewn, decorated with beads, feathers, and anything else to give the doll charm and uniqueness.
Master class: rag doll Tilda
To work you need:
1. Body fabric. Calico, cotton, flannel are suitable. Some people like knitwear. The color of the fabric is flesh or white, which can be dyed with tea.

2. Sewing supplies (scissors, needles, threads, pencil) It’s good if you have a sewing machine.
3. Filler. You can take any ready-made one, or you can just finely chop old tights.
4. Fabric for clothing. Any, depending on your imagination.
5. Decorations.
6. Paper.
To make these we draw on paper. All body parts are separate. Cut it out. We fold the flesh fabric in half “face” inward, pin it so that it does not move, and transfer the pattern onto it. We don't cut it! First, we sew the fabric along the lines, leaving the lower torso, arms and legs free at the points of attachment to the body. Now we cut it out, carefully turn it inside out and stuff it with filler. An additional seam can be made at the knees and feet so that Tilda can bend her legs. Stuffed? Now let's sew everything together. We embroider the doll's eyes and mouth. Her hair can be made from threads, or you can loosen a satin ribbon. All. Tilda is ready. All that remains is to dress her.
Waldorf cuties
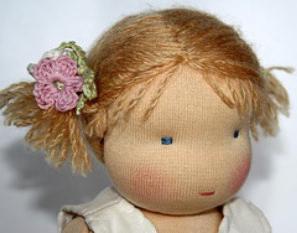
Rag dolls, invented at Waldorf for the purpose of raising children, are distinguished by the correct proportions of their bodies. Based on the manufacturing principle, they are similar to Tilda, only there is no seam on their faces. Their base is made so that the nose stands out. Some craftswomen make chins and nasolabial folds for their cuties. The eyes and mouth are embroidered with thread, the cheeks are browned. Both children and adults like these rags and draw them on paper. They include 2 arms and a torso along with legs. The head is made separately. To do this, take a square piece of white or flesh-colored fabric. Place the filling in the middle, carefully pull it together to form a ball, and sew it together. Subsequently, the body filled with filler is sewn to the head, then the arms. A lot of time is devoted to the doll's hairstyle, on which its individuality depends. Waldorf hair is made from threads, carefully sewn stitch by stitch to the head. Hair can be made long, braided, combed. Her outfits are created with no less scrupulousness than the doll itself.
Dolls made from wardrobe items

Everyone in the house has lost socks or tights with arrows that you can’t wear and it’s a shame to throw them away. It turns out that they can be given a wonderful second life. How to sew a rag doll from stockings or tights?
Method one. From thick cardboard we cut out the arms, legs, head, and torso of the future doll. You can glue thin foam rubber to them and cover them with stockings, or you can do without foam rubber. We carefully sew all the parts together. We decorate the face with button eyes and embroider the mouth. We attach hair to the head or put on a cap. We dress the doll. You can attach a magnet to its back and use it as a souvenir.
Method two. We find a strong and at the same time highly flexible wire. From it we create the frame of the future doll. We make all parts of the body separately and then sew them together. We glue foam rubber onto the frame, put on a stocking, and carefully sew it together. The faces of such dolls turn out to be extraordinary, because you can create a wide variety of noses, lips, cheeks, and eyelids. The result is beauties, old ladies, and gnomes.
It might be useful to read:
- Do-it-yourself hedgehog made from plasticine and seeds Children's craft made from seeds hedgehog and plasticine;
- The story of one very ugly girl;
- Superb breasts. Beautiful breasts. The best tips and tricks on how to make your breasts beautiful. Small breast shapes;
- Master class on decoupage of New Year's balls for beginners Volumetric decoupage of New Year's balls;
- How to knit short rows with knitting needles: methods and master class;
- Nourishing and protective hand creams - a detailed review of the best offers The best hand cream in winter;
- How to do a languid look;
- Download champagne wedding label;