DIY paintings from seeds. Crafts from seeds
As you know, a cozy atmosphere in the house is created by various little things - lamps, vases, paintings. Things made with your own hands give a special charm. And for your own creativity it is not necessary to use expensive materials. Look around - there are many objects around that can be used for various kinds of decorative things. In particular, natural materials are the best option for crafts: exclusive, environmentally friendly, and cheap. Pay attention to crafts made from watermelon seeds. Every family loves the largest berry - watermelon, and the seeds are usually thrown away. And if you collect them and dry them, you will have valuable material in your hands for, say, a three-dimensional figure, a painting or an appliqué made from watermelon seeds. And if you frame these crafts, you will get a wonderful gift or element of home decoration. And to make it easier for you, we will provide you with several master classes with ideas for decorating with watermelon seeds.
Panel of watermelon seeds
To make a painting you will need the following materials:
- Watermelon seeds. We also recommend using other seeds - sunflower, melon, pumpkin, then the overall composition will look advantageous.
- Glue "Moment Crystal".
- Bottle stoppers.
- A piece of birch bark.
- Frame.
- A sheet of cardboard and the remains of wallpaper with a natural background.
So, let's start making a picture of watermelon seeds:


Crafts from watermelon seeds: box
A real work of art is obtained from an ordinary jar with a lid and the same watermelon seeds. So, for work you will need the following materials:
- watermelon seeds themselves;
- a jar with a lid, glass or plastic - any one you can find on the farm;
- hot melt glue or Moment Crystal glue;
- aerosol enamel;
- tweezers;
- piece of tissue paper:
- scissors:
- needle with thread.


This is how you can easily create a real masterpiece - a box for all sorts of little things - sewing accessories, jewelry, memorabilia. The inside of the craft can be carefully covered with cloth or foil.
Any parent strives to put the maximum benefit into his communication with his child. Making crafts from small objects together will not only keep your baby engaged, but this activity also helps strengthen children’s hands and develop fine motor skills.
Mom always has a variety of grains and cereals in her kitchen. Therefore, DIY crafts from cereals and seeds will be great entertainment for a child and a salvation for parents. How to make them? We'll tell you now.
Herringbone
You can start getting acquainted with this exciting activity with a simple craft made from pumpkin seeds. The Christmas tree is quite easy to make. A bucket lid, a pen refill and plasticine are suitable for this work. First you need to prepare the “soil”. To do this, spread the plasticine thinly and evenly onto the surface of the lid. Now we need to make the barrel. To do this, glue a small ball of plasticine to the middle of the lid, fix the rod in it and apply layers of plasticine on it. Next, the barrel needs to be improved a little. We paste the prepared base in a circle with thin strips and begin to attach needles and seeds from below. Glue it in a checkerboard pattern, slightly lowering the needles down. That's it, the Christmas tree is ready. All that remains is to paint the seeds green.
Bouquet

What other crafts can you make from pumpkin seeds with your own hands? For example, a bouquet of flowers. To make such a craft, you need to take seeds, glue, a leaf template, scissors, a circle template, dry twigs, and burlap. Having cut out a circle with a diameter of six centimeters from cardboard, glue it to its edge with the tip outward. When the first row is ready, perform the second, third and fourth. We don’t glue the middle, we’ll make a small hole in the center and decorate with peas. Then, turning the workpiece over, glue a row of seeds on the other side in the same way. Then we close it with a circle of pre-cut coarse burlap. The dry twig will be a stem, which must be decorated with leaves cut from the same burlap. Several flowers made in this way will make a beautiful bouquet.
Plant petals can be glued in three different ways. The first option is described above. In the second, the seeds are arranged with the round end facing outward. And in the third option, the combination is as follows: the first three rows are glued with the point outward, and then vice versa, with the point inward. Each time the flower will take on an unusual shape.
Plate with fruits
They will be an original decoration of the room. Here is an example of such a product - a plate with a pattern of cucumber and apple seeds. On a disposable paper plate we apply a drawing with large details, for example, the outline of a goose. Apply glue, starting from the tail, and carefully glue the seeds. We make the wing pattern from apple seeds. We reach the head. We lay out the beak and paws with seeds, pre-painted red. All that remains is to make the background. To do this, coat the plate with glue and sprinkle with gouache-painted semolina, laying out the desired design. This product will be a wonderful decoration.
"Owl"

DIY crafts made from pumpkin seeds can become a real masterpiece if you combine paint, fabric and other available materials in one work. An example would be: To work, you need to prepare the following materials: wooden frame, fabric, cardboard, pumpkin seeds, twigs, paints, glue, plasticine, toothpicks, brush. Now you can start doing the work. We stretch the fabric over the cardboard and insert it into the frame. Using glue, we attach several branches, imitating a tree branch. On one we lay out a figurine of an owl, attach the eyes and beak.

We glue them onto the remaining branches separately, placing them like leaves. Below the branch on which the owl is sitting, we glue three seeds: they will be the tail. Add black plasticine to the paws: these will be the claws. Now all that remains is to decorate the applique. We color the feathers with color and the beak with orange. We paint the seed leaves green. And now the owl is ready. This picture can decorate a child's room.
Conclusion

DIY crafts made from pumpkin seeds about autumn can demonstrate all the child’s imagination. All the beauty of this time of year will allow you to enjoy the exciting process of making a product. By creating paintings on such topics, a child learns about the world and learns to understand beauty.
In addition, as mentioned above, working with small materials at hand trains the child’s perseverance and accuracy when performing any work. And by making crafts from pumpkin seeds with their own hands, the child learns to do work with someone else and appreciate the results of his work.
DIY crafts made from grains, cereals and various seeds are a great way to keep children busy, because working with such natural material perfectly trains fine motor skills, which helps improve general and speech development. Also, such activities help to cultivate patience, diligence and perseverance in children.


Features of creativity using natural materials
Not only schoolchildren can make crafts from cereals with their own hands, because such joint creativity is suitable even for small children. True, you will need to be with the kids constantly so that they do not harm themselves in any way.
So, the following materials may be useful to you:
- all kinds of cereals and grains - buckwheat, rice, millet, semolina;
- legumes - peas, lentils and multi-colored beans;
- any seeds and seeds - watermelon, pumpkin, melon and sunflower, etc.

You can even take it. Also in the process you will need: thick paper or cardboard, glue, scissors, fabric, plasticine, templates of various patterns, decorations (at your request).
The best DIY crafts made from cereals, seeds and sunflower seeds are appliqués and paintings. You can come up with stories with your child yourself, or use some ready-made templates and transfer them to paper. The complexity of the work should depend on the age of the children; keep in mind that the child should be interested in making the craft on his own, even with your help, but not be completely aloof.

We create applications and paintings with our own hands
The topic of work can be anything. But crafts made from grains and other natural materials on the theme of spring turn out to be very beautiful and original. Spring landscapes (crafts made from watermelon seeds and cereals), lush flowers (flowers made from pumpkin seeds are especially good - asters, sunflowers, snowdrops) are great ideas for children's creativity.
The more different cereals, seeds and seeds you use, the better, because they all not only vary in size and shape, but also in color and texture. That is, you will have a huge space for imagination and creativity. And if your grain craft requires some special colors, then you can always paint your materials using watercolors or gouache.
Try starting with a simple appliqué. For example, as a craft, you can make a basket with flowers from pumpkin seeds.
- Draw the outlines of the basket on a piece of thick paper or cardboard and spread them with glue.
- Next, place pumpkin seeds along these contours to make a three-dimensional basket.
- Inside, draw flowers in exactly the same way - these can be sunflowers, asters, poppies, daisies, snowdrops or any others. Use seeds of various sizes to create them - pumpkin, watermelon, sunflower seeds.
- The centers of the flowers can be made from beads or filled with fine grains.
- Paint your bouquet and paint the basket brown. You can decorate the applique with sparkles or stickers, or add some plasticine details.
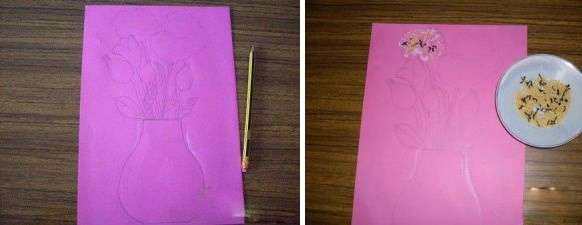
It’s easy to make a vase of flowers on a spring theme, just like a basket. To keep children's crafts made from seeds for a long time and not fall off, you can spray them with hairspray or coat them with clear nail polish.
A favorite activity for children will be creating applications and paintings depicting various animals, birds or fish. Together with your child, come up with a plot and bring the fairy tale to life using crafts made from pumpkin or watermelon seeds, as well as other various materials.


Fish, hedgehogs, bees, snails, ducks, cats and other animals are incredibly cute. See how easy it is to make a picture of a hedgehog as a craft from seeds.
- Print out a drawing of a hedgehog or draw one yourself.
- Apply a good layer of glue to his back and start gradually attaching seeds to him (these could be watermelon seeds or sunflower seeds).
- You need to glue the seeds so that they all point with their sharp tips in one direction.
- You can simply paint the rest of the hedgehog’s body, and attach mushrooms or fruits made from plasticine to its spines.
But what an interesting picture you can create with a peacock using watermelon seeds, as well as semolina and corn grits.
- Draw a peacock on thick paper or print out a ready-made template (even regular coloring books will do).
- Apply glue to the round ends of the feathers and cover them with corn grits. Do the same with the bird's legs.
- When it dries a little, shake off the remaining residue from the sheet.
- Decorate the feathers with watermelon seeds, gluing each one tightly.
- After some time, cover the entire remaining peacock image with glue, except for the head, and fill it with semolina, while clearing the contours with a toothpick.
- You can paint the head and decorate the picture as you wish. As you can see, crafts from watermelon seeds are very simple to make.


Other ideas for crafts made from natural materials
A picture can be not only an image of something, but also simply a panel made of cereals, seeds and other natural materials.
It is better to make such a panel on fabric (as a rule, burlap or other natural fabric is used), but you can also use paper. Divide your space into different sectors - these could be geometric shapes or abstraction, and then fill them with various grains and seeds (choose material of different colors, textures and shapes, combine them and try to combine them correctly).

To separate the sectors, use jute twine - then your natural panel will turn out more organic. Usually such paintings are not painted, but they can be fixed with varnish.
With older children, you can try to create three-dimensional figures or toys, like crafts from seeds and cereals. Then the material will need to be attached to the frame of your product, for example, you can make a house for some fairy-tale hero, a mold for a candlestick, or decorate a photo frame.
Do-it-yourself crafts from seeds is an idea for a wonderful joint creativity with children, which will bring benefits and a good mood for your whole family.
Cereals and coffee beans are the most accessible materials for handicrafts, which are found in almost every home. They make very creative crafts that can be used to decorate the interior or as a gift to a loved one. Crafts made from cereals will allow you to fully unleash your creative abilities and also be fun to do with your children.
If we talk about coffee beans, they not only have a pleasant aroma, but are also quite practical for creative work, as they have optimal parameters. In addition, the smell of high-quality grains stabilizes the nervous system and helps stimulate children's powers of observation, perseverance, the formation of creative thinking and an original approach to business.
How to make paintings from coffee beans
- A suitable size photo frame.
- Polymer glue or heat gun.
- Depending on the idea of the future painting, you can purchase colored paper, aerosol or watercolor paints, as well as any other accessories to your taste.

Before starting work, you need to remove the glass from the frame and remove the protective film from the frame, remove the cardboard lining, and if desired, you can cover it with paper, a plain fabric, or paint it.
Then you need to think over a sketch of the future work. Using a simple pencil, outline the location of the drawing. You can pre-lay out the grains without gluing them to the base, which will allow you to better think through the design and, if desired, modify it. By carefully thinking through the picture, you can avoid mistakes and omissions. In general, the grains can be placed however you want, in absolutely any direction.
If you want to change the shade of the grains, you can tint them with watercolors or spray paints. Don't forget about different types of coffee, which also have differences in color.
Once you have decided on the color and design idea, you can start gluing the grains. You should not use too much glue, because during the work it can stick out and create unwanted stains. Remove excess glue in a timely manner by blotting it with a dry cloth.
Instead of a photo frame, you can use a wall clock as a basis and also use it as a basis for your creativity.


No less relevant is the idea of creating a kind of coffee tree or. It can be made by placing a stick on a stand and attaching a ball of light material, such as paper, to the top. Subsequently, the surface of the ball and the stand are covered with coffee beans.
Crafts from cereals for children in kindergarten

The technique of gluing cereals onto paper differs from the previously presented version with coffee beans. For example, legumes can be glued separately. Small grains can be poured onto a surface coated with glue through a stencil.


Alphabet of cereals for children
When introducing a child to letters, as well as learning to read, it is best to use the three-dimensional letter technique. This will help him remember the letters faster and he will be able to enjoy the unique game.
Materials:
- A sheet of cardboard in a neutral shade;
- Pencils;
- PVA glue;
- Scissors;
- Cereals: beans, peas, millet, etc. at your discretion.

Decorate the bottle with cereals or seeds

This craft will be a rather unusual decoration for your home. The design depends on the color of the cereals, which, just like coffee ones, can be tinted.
Educational games using semolina
Games with cereals are widely used to develop fine motor skills in children. To increase interest in the game, the croup can be colored. The essence of the method is that the cereal is poured onto a tray or any other flat surface, giving the child the opportunity to make original designs using his fingers. To begin with, you can choose fairly simple shapes like a circle or square, and then move on to some more specific objects. This technique also develops the baby's creative thinking.

Cereals, seeds and coffee beans are widely used in handicrafts. At the same time, they can be used to make a large number of creative products, interior decorations and even exciting games for children. you can transform ordinary food items and old home decor items into beautiful handcrafted items.
It might be useful to read:
- The story of one very ugly girl;
- Excellent breasts. Beautiful breasts. The best tips and tricks on how to make your breasts beautiful. Small breast shapes;
- Master class on decoupage of New Year's balls for beginners Volumetric decoupage of New Year's balls;
- How to knit short rows with knitting needles: methods and master class;
- Nourishing and protective hand creams - a detailed review of the best offers The best hand cream in winter;
- How to do a languid look;
- Download champagne wedding label;
- How to understand that a guy likes you;